Groups: Organizing Charts, QuotePages, Signals & More
A Group is simply a named collection of objects and (possibly) other groups, called subgroups. Objects are things you work with in Investor/RT, e.g. charts, quotepages, scans, signals, custom indicators, preset, etc. Groups give the Investor/RT user a facility for organizing collections of objects into named categories and subcategories. Instead of going through a list of 200 chart names looking for the one you want, you can setup one or more groups with appropriate names to hold shorter lists of charts.
At the highest level there is an unnamed group which is the collection of all the top level groups. Each top level group can in turn have any number of subgroups. There are (at present) four pre-defined top level groups. These are named:
- Recent RTL
- Recent Charts
- Recent Items
- Recent QuotePages
System Defined Groups & Preferences
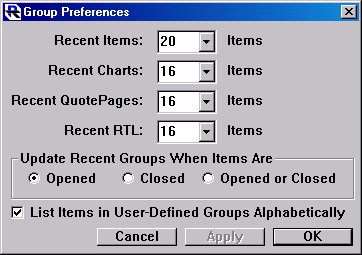
These are system-defined groups which, like system-defined quotepages, have names beginning with a period. These groups are used by Investor/RT to keep track of various objects you have opened or closed recently. For example, each time you open a scan or signal or custom indicator, the name of the object is added to the .Recent RTL group. Similarly, recently referenced charts and quotepages are listed in the .Recent Charts and .Recent QuotePages groups, respectively. The .Recent Items group keeps track of the last objects you have opened regardless of type. When viewing lists of objects in groups, Investor/RT will list the objects in "last-in-first=out" (LIFO) order, e.g. the most recently opened chart will be listed first in the .Recent Charts group. Setup: Preferences: Groups opens a window where you can specify how many items to maintain in each of the four .Recent groups. You specify here whether you wish the .Recent groups to list items that you have recently opened, or only those you have recently closed, or those that you have either opened or closed recently.

Creating Groups and Subgroups
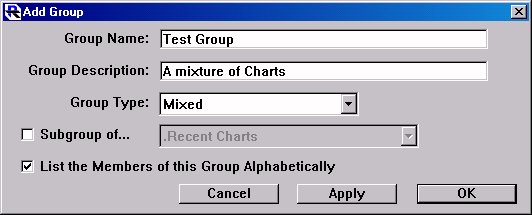
The groups concept is well integrated into the Investor/RT user interface. First, there is a Groups button on the main toolbar. Its icon looks like a file folder. Clicking this button shows you a list of your groups including the system defined .Recent groups. These are all called "top level" groups. Right-clicking the Groups button on the main toolbar opens the "Add Group" window. When creating a new group using this window, you can specify if the group is to be a subgroup and if so, the group to which it will belong. There is also a checkbox for specifying that the members of the new group should be listed alphabetically. If you uncheck this checkbox, the items will be listed in the order that the members were added to the group, with the most recently added member listed first.

The File Menu has group-related menu items in various places: File: New: Group – opens a window for defining a new group/subgroup. File: Open: Group (Alt-4) - lists the top level groups. File: Open: Recent Items – lists the items in the .Recent Items group. File: Add to Group

- Opens a window for adding the front object to a group
- Adds all open charts to a group
- Adds all open objects to group
The Open Menu has a Groups submenu. It lists all of the top level groups, e.g. Open: Group: .Recent Charts will show the list of recently opened chart objects. When you click on a button on the main toolbar to open a quotepage a chart or an RTL object (scan/signal/custom indicator) Investor/RT will present a selection list of names. At the top of the list will be the appropriate .Recent group name, e.g. the group name .Recent Charts will appear at the top of the list of charts you can open. Double-click on the .Recent group name and the selection list will be replaced by the list of items in that .Recent group.
Delete/Rename Facility
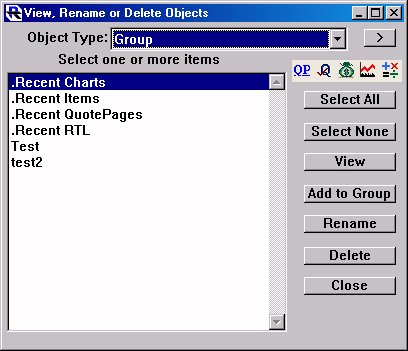
The Delete/Rename facility allows you to view, rename or delete groups. It also has a powerful "Add to Group" facility for quickly adding lists of objects of various types to a particular group.

Using the Delete/Rename Window to Setup Groups. The Delete/Rename facility is accessed by clicking the Green Trash icon on the main toolbar (or via the Control: Data Management submenu). This window can be used to view, delete, or rename many kinds of Investor/RT objects. This window has a new "Add to Group" button just below the "View" button. You can select one or more objects of any type in the list of object names (on the left) and add them to any group by clicking the Add to Group button. You will be prompted to pick the group to which the item(s) will be added. The Delete/Rename window now lists "Group" as one of the types of objects. Choose "Group" from the "Object Type" menu and the list box on the left will list the name of all groups. Each top level group and each subgroup, regardless of level is listed. You can delete groups by selecting one or more of them and clicking the Delete button at the right.
Another interesting use of the Delete/Rename window is to use it as an always available selector for your groups. Open the Delete/Rename window, choose Groups as the object type. Then resize the window so that only the list of group names is visible. Position the window at some convenient location. Whenever you wish to access any of your groups or any of the .Recent Groups, simply double click on the group's name. A list selection window will popup showing you the contents of that group. Traditional chart windows and quotepages have "Add to Group" commands in their popup menus. To add a particular chart to a group, open the chart, right-click in the chart and choose Add to Group. A dialog box will appear listing the group names. Pick the group and click OK to add the chart to that group. Note that the dialog box has both Apply and OK buttons. You can add any chart to several groups by clicking Apply, then changing the group, and applying again, until you are finished. For quotepages, click the "+" button in the upper right corner of the quotepage above the vertical scrollbar and choose Add to Group. All other types of objects are added to groups using the File: Add to Group… command (or the Delete/Rename window as discussed above). First open the object, e.g. a scan or signal, and choose File: Add to Group to add that scan or signal to one or more groups. Note that the File: Add to Group… command always operates on the front window.
Navigating Groups
When you click the Open Groups button on the main toolbar (Alt-4 is the built-in shortcut) you will see a standard Investor/RT selection window showing you all of top level groups. At the top of the list is a special item titled " …Create New Group" you can click on to add a new group. Double-click any group name (or select the group name and click OK or Apply to "open" that group. The list selection window will then show the contents of the selected group. The name of the group whose members are listed appears in the lists window title. Items in the list can of three types:
- Command Items – listed first and prefaced with …, these are items that you can "do" to the group. For example, ...Add to Group, ...Create New Group, ...Create New Subgroup, ...View Parent Group
- SubGroup Names – listed next. Subgroup names are shown in brackets (Windows) or are prefixed with bullet (Macintosh) to distinguish them from member objects.
- Objects – listed last, e.g. chart names, quotepage names, the member objects of the group.
Double-clicking an item in the list or selecting it and clicking Apply or OK "opens" that object. If the object is a chart name, that named chart window will open. If it is already open, it will be brought to the front. If the object is a subgroup, the list selector will "navigate" down a level to show you the contents of that subgroup. Only one list selection window can be open at a time. When viewing the contents of a group in a list selector, Investor/RT adds one or more command item as choices at the top of the list. The command items are:
- Add to Group – used for adding the front window to the listed user-defined group. This command does not appear when a .Recent group is listed.
- Create New Subgroup – used to add a new subgroup to the listed user-defined group. This command does not appear when a .Recent group is listed.
- View Parent Group – used to navigate up one level to the parent group of the listed subgroup. This command does not appear when viewing the list of top level groups since there is no parent group.
You can double-click on any of these command items to initiate the effect, or select the command with the keyboard or with a single click and then click Apply or OK.
When viewing a list that contains one or more member objects you can click the "All" button at the bottom of the list to open each of the listed objects.
Deleting Objects and Groups, shortcut
Any object or group can be deleted by selecting it in the list selection window and holding down the ctrl-key while clicking Apply or OK. Macintosh users hold down the option key instead. You can also ctrl-double-click to delete an object or a group from the list. Confirmation will be requested when deleting a group. Deleting a group implies that all of its subgroups will be deleted as well.
Using Keyboard Shortcuts
Setup: Preferences: Keyboard Shortcuts can be used to assign a function key combination for opening any particular group. For example, you could setup F2 to "Open: Group: .Recent Charts". Whenever you wish to re-open (or bring to front) a chart you opened earlier, just press F2 and the list of recent charts will appear. Double-click on the chart name you want and it will appear. Note that "opening a group" means simply to show you the contents of the group in a list selection window so you can selectively open one, several, or all of the objects in the displayed list. To open one object in the list simply double-click it. To open several items in the list, select each item in turn and click Apply. To open all of the items in the list, click the All button. The list selector can also be navigated with the up and down arrow keys on the keyboard to move the highlighted selection up or down. When a name or command is highlighted, press enter to "OK" that item or press shift-enter to "Apply" that item, leaving the list visible for another selection. When a list selection window is in front, you can type a character on the keyboard the advance to the first name in the list beginning with that letter.

